


Magic FLIES
How to use Marc Petitjean’s Magic Tool to mix CDC fibers, hackle, dubbing, and fur.
As a professional fly tier I have tied approximately 20,000 flies per year during the last 18 years. I have had plenty of time to think about and study the problems I face both as a fly tier and fisherman.
Some time ago, I decided there were two major fly-tying problems I wanted to solve. I wanted to wind feathers of all types and sizes on hook shanks of various sizes–for instance a large soft-hackle feather on a small hook or a CDC feather wrapped parachute style. Because there are very few solid colors in nature, I also wanted to mix CDC colors or mix materials as I wrapped to add dimension to my flies and create either realistic or fantastic color combinations. The commercial dyeing process that produces consistent colors in huge batches is actually the antithesis of what you see in nature. Painters realistically portray life by mixing colors on a palette. Mixing colors is how you produce natural realism.
Based on these two unresolved problems I developed the Magic Tool. The Magic Tool is a set of small clear plastic table clamps or snap tools. First, I fold various materials into the jaws of the clamp to align, size, or mix materials. Then I grab the tips of the material with another clamp, cut away the excess (including any hackle stem), and add the material to a dubbing loop and wrap the fly. With this technique I can easily create CDC parachute hackle without the annoyance of the thick CDC stem or the difficulty of finding a CDC feather that is correctly sized for a small dry fly.
To use the tool, hold a CDC feather with two hands by the tip and the butt. Line up the stem with the jaws of the clamp and press the feather into the clamp. The light downward pressure causes the fibers to fold straight up. The stem is at the bottom of the clamp and the fiber tips extend past the clamp jaws.
Next, grab the CDC fiber tips with the Magic Tool bulldog clamp, gauge the length of CDC required for the fly, and with a long pair of scissors cut the correct length of fibers from the feather stem. This hackle substitute is now correctly sized, stem-free, and in a convenient clamp ready to be placed into a dubbing loop.
Using the same process you can place two or more different-colored CDC feathers in the clamp and create the multi-hued effect I discussed earlier. You can create an unlimited number of hackle substitutes with this tool. Press dubbing into the clamp using a CDC stem (or any hackle stem) to create a dubbing and hackle mix that wraps on the hook in one step. Try this technique for Woolly Buggers and other hackled wet flies. I can also use large soft-hackle feathers to wrap collars on small flies.
The tool allows you to get rid of the skin on strips of fur the same way you remove the hackle stem. Imagine a concoction of flowing rabbit fur together with long soft Spey hackle you can palmer on the body in one step. If you play with the angle of the bulldog clip when you grab the elements, you can create a rope with long fibers at the bottom and shorter fibers at the top for a tapered silhouette.
Wrap long synthetic material like Angel Hair or Krystal Flash around the wooden dowel segments provided with the tool. Cut the material lengthwise along the dowel to create ¼- to ¾-inch-long hanks of material that can be pressed into the clamp along with other materials. If you want to add material without a hackle stem, or if the hackle stem section you have is too short to extend past each edge of the clamp, use a length of wire to press the material into the clamp and then slide the wire out either end of the clamp. When compared to dubbing brushes used for similar purposes, there is no added weight or bulk from the wire–always a consideration when tying dry flies–and you always have the right amount of material exactly where you want it. You can add weight before you wrap your material (lead wire) or as a wire rib.
After a few years of research and development, I continue to discover new applications and look forward to seeing what other tiers can make with this tool.
The Magic Tool is available in the U.S. retailers for $29.95 or directly from Petitjean Fishing Equipment in Switzerland (011 41 26 481 1779).
Marc Petitjean, lives in Fribourg, Switzerland. More information on his tool is available at www.petitjean.com/.
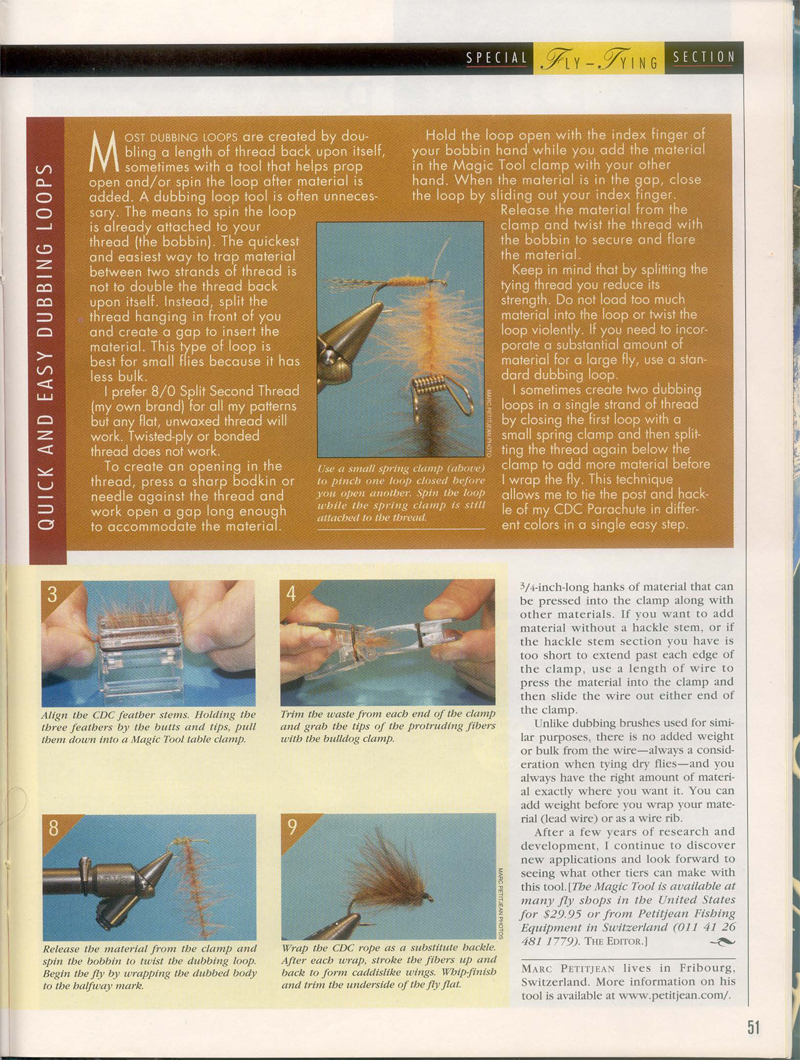
Quick and Easy Dubbing Loops
Most dubbing loops are created by doubling a length of thread back upon itself, sometimes with a tool that helps prop open and/or spin the loop after material is added. A dubbing loop tool is often unnecessary. The means to spin the loop is already attached to your thread (the bobbin) and the quickest and easiest way to trap material between two strands of thread is not to double the thread back upon itself but to merely split the thread hanging in front of you and create a gap to insert the material. This type of loop is best for small flies because it has less bulk.
I prefer 8/0 Split Second Thread (my own brand) for all my patterns but any flat unwaxed thread will work. Twisted ply or bonded thread does not work
To create an opening in the thread, press a sharp bodkin or needle against the thread and work open a gap long enough to accommodate the material. Hold the loop open with the index finger of your bobbin hand while you add the material in the Magic Tool clamp with your other hand. When the material is in the gap, close the loop by sliding out your index finger. Release the material from the clamp and twist the thread with the bobbin to secure and flare the material.
Keep in mind that by splitting the tying thread you reduce its strength. Do not load too much material into the loop or twist the loop violently. If you need to incorporate a substantial amount of material for a large fly, use a standard dubbing loop. I sometimes create two dubbing loops in a single strand of thread by closing the first loop with a small spring clamp and then splitting the thread again below the clamp to add more material before I wrap the fly. This technique allows me to tie the post and hackle of my CDC Parachute in different colors in a single easy step.
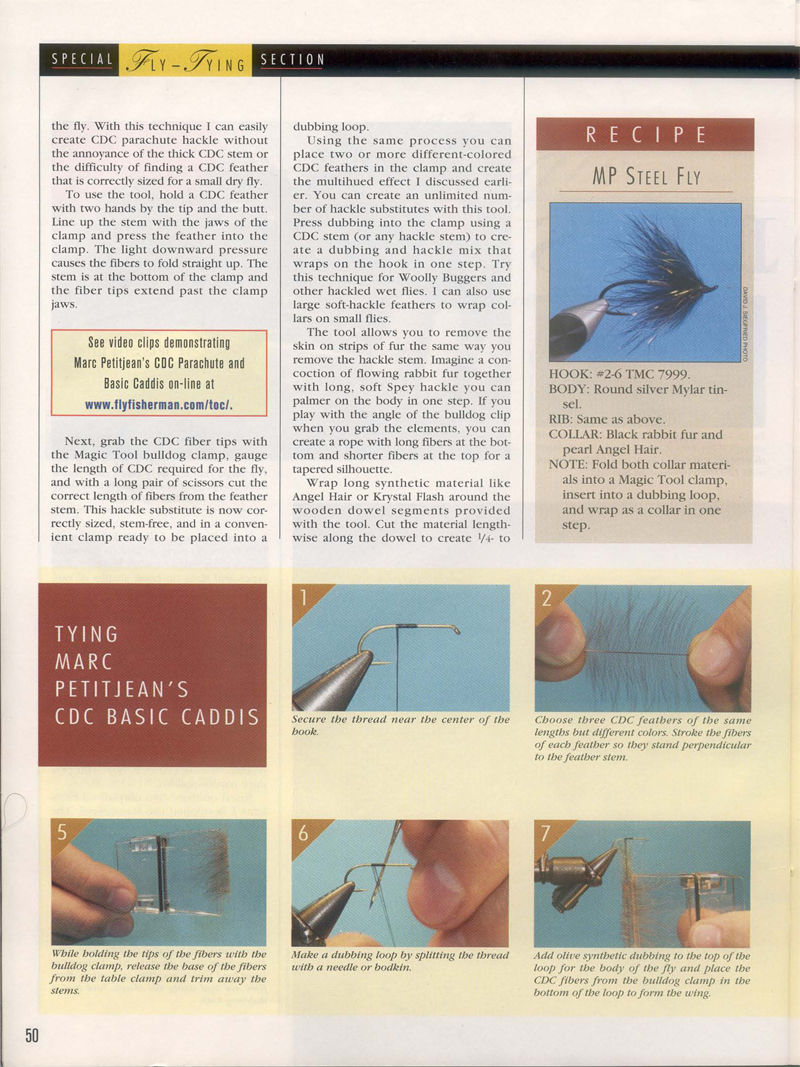
Marc Petitjean’s Basic Caddis
1. Secure the thread near the center of the hook.
2. Choose three CDC feathers of the same length but different colors. Stroke the fibers of each feather so they stand out at a 90-degree angle perpendicular to the feather stem.
3. Align the CDC feather stems. Holding the three feathers by the butts and tips, pull them down into a Magic Tool table clamp.
4. Trim the waste from each end of the clamp and grab the tips of the protruding fibers with the bulldog clamp.
5. While holding the tips of the fibers with the bulldog clamp, release the base of the fibers from the table clamp and trim away the stems.
6. Make a dubbing loop by splitting the thread with a needle or bodkin.
7. Add dubbing to the top of the loop for the body of the fly and place the CDC fibers from the bulldog clamp in the bottom of the loop to form the wing.
8. Release the material from the clamp and spin the bobbin to twist the dubbing loop. Begin the fly by wrapping the dubbed body to the 50 percent mark.
9. Wrap the CDC rope as a substitute hackle. After each wrap, stroke the fibers up and back to form caddis-like wings. Complete with a whip-finish and trim the underside of the fly flat.
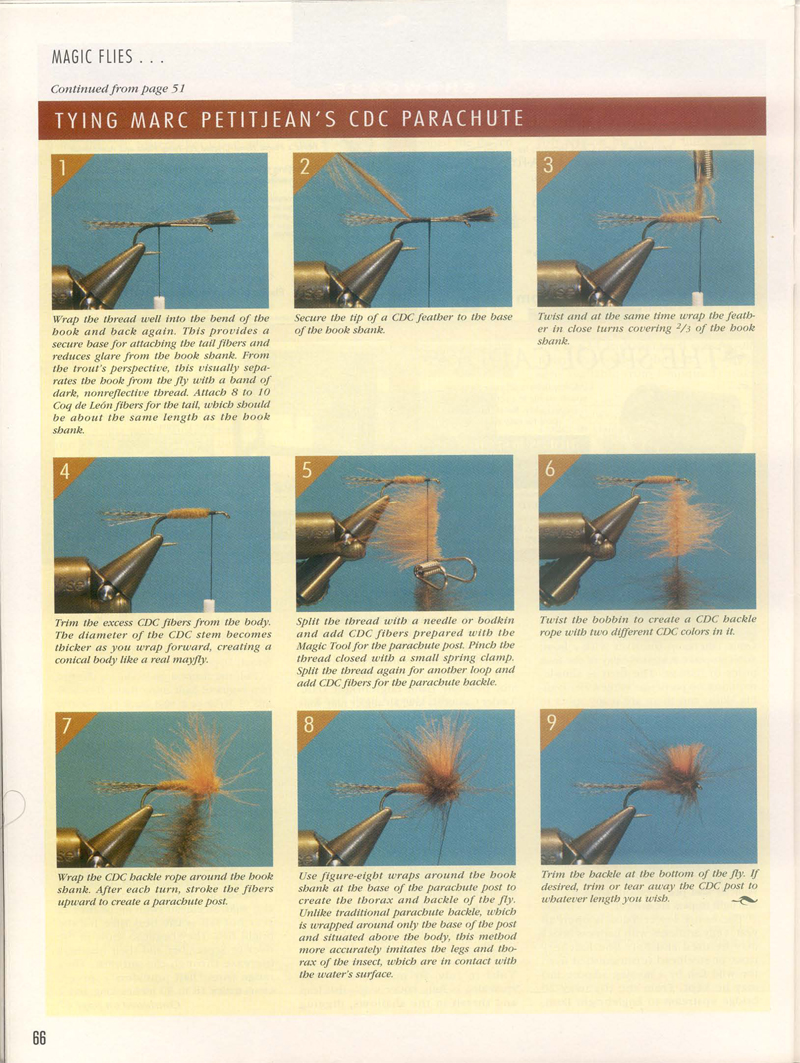
Tying the MP CDC Parachute
Wrap the thread well into the bend of the hook and back again. This provides a secure base for attaching the tail fibers and reduces glare from the hook shank. From the trout’s perspective, this visually separates the hook from the fly with a band of dark, non-reflective thread. Attach 8 to 10 Coq de Leon fibers for the tail, which should be about the same length as the hook shank. Secure the tip of a CDC feather to the base of the hook shank. Twist and at the same time wrap the feather in close turns covering two thirds of the hook shank. Trim the excess CDC fibers from the body. The diameter of the CDC stem becomes thicker as you wrap forward and creates a conical body like a real mayfly. Split the thread with a needle or bodkin and add CDC fibers prepared with the Magic Tool for the parachute post. Pinch the thread closed with a small spring clamp. Split the thread again for another loop and add CDC fibers for the parachute hackle. Twist the bobbin to create a CDC hackle rope with two different CDC colors in it. Wrap the CDC hackle rope around the hook shank. After each turn, stroke the fibers upward to create a parachute post. Use figure-eight wraps around the hook shank at the base of the parachute post to create the thorax and hackle of the fly. Unlike traditional parachute hackle, which is wrapped around only the base of the post and situated above the body, this method more accurately imitates the legs and thorax of the insect which are in contact with the water’s surface. Trim the hackle at the bottom of the fly. If desired, trim or tear away the CDC post to whatever length you wish.